
If you’re into kayaking, you’ve probably heard about skegs. Maybe your inflatable kayak even came with a skeg. But what are these pieces of equipment, exactly, and why should you care?
Skegs are similar to rudders in that they can help you with steering and maneuvering, but they serve a different purpose than rudders and are designed to move differently.
So, you may be wondering, do I even need a skeg for my inflatable kayak? If so, how do I install it? How do I take care of it to keep it functioning as it should? Can I make my own skeg, or do I need to buy one?
Great questions! Let’s dive in and find out the answers.
Table of Contents
What is a Skeg on a Kayak?

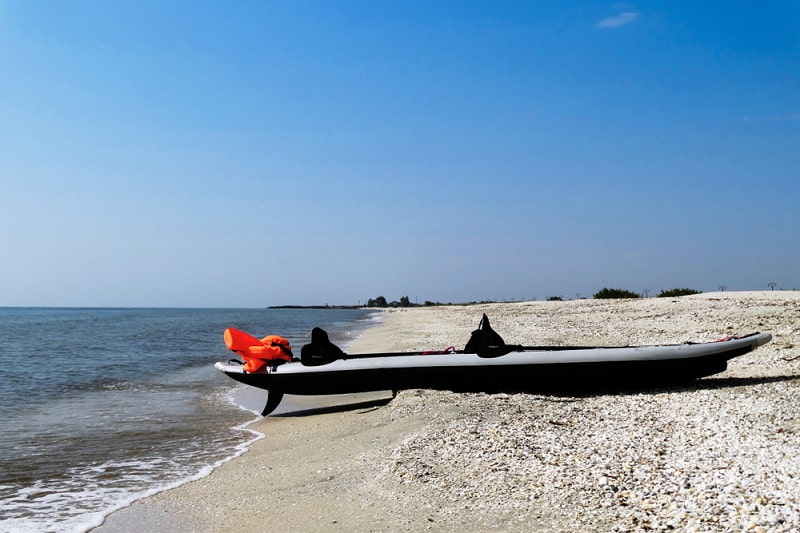
A skeg is a retractable or removable fin found on the bottom of a boat. On a kayak, the skeg can be mounted on the hull near the stern.
Many inflatable kayaks come with a built-in skeg slider and plastic skeg. The slider allows you to remove the skeg between uses.
Skegs should not be confused with rudders, which are similar in shape but are typically mounted on the stern. Rudders can pivot from side to side and help to steer your boat; skegs have a slightly different purpose.

So, what exactly does a skeg do? What purpose does it serve on a kayak?
A skeg’s primary function is to help your boat deal with crosswinds. The more you lower it into the water, the more it will help you stay trimmed even in windy conditions.
If you lower it all the way, it will cause you to turn with the wind, rotating your kayak 180 degrees so you can go back the way you came.
It can take some practice to get the hang of using a skeg, as you have to learn how much to raise and lower it in different weather and water conditions. But once you know how to use it, having a skeg on your inflatable kayak can make your day on the water go much more smoothly.
Keep in mind that skegs need regular maintenance–they can become jammed with small rocks in the skeg slider, making it hard or impossible to raise and lower or remove the skeg. We’ll talk more about skeg care and maintenance later in this article.
Do You Need a Skeg on a Kayak?

The short answer is no–you don’t necessarily need a skeg to be able to go kayaking. If you did, then every kayak would come with a skeg already built in.
That said, there are times when it’s advisable to have a skeg and to know how to use it.
As mentioned, skegs are designed to help you stay on course or maneuver your boat in windy weather. So, if you frequently kayak in windy conditions or choppy waters, it’s a good idea to have a skeg mounted on your kayak–that way, you have it available for when you need it, even if you don’t use it every time.
Using a skeg can help you stay on course by preventing drifting and weathercocking (turning into the wind). This can keep you safe letting you maintain control of your kayak even in challenging conditions.
With a skeg in place, you may find that it’s easier to paddle in rough and windy conditions because you won’t have to exert as much energy to stay on course or trim to the wind.
Again though, having a skeg is not completely necessary, especially if you tend to stick to calmer waters and windless days.
Can I Kayak Without a Skeg?


Yes–in fact, there are times when it’s better to kayak without a skeg.
Though skegs generally help you in windy conditions, they can cause you to spin all the way around in a circle (weathercock) if you put them all the way down in windy conditions. If you’re unfamiliar with using a skeg, this can cause you to lose control of your kayak.
Skeg sliders can become jammed with small rocks and other debris they pick up from the water, making them a pain to use.
If you’re a casual kayaker who usually sticks to calm waters or still days, you might be better off not using a skeg.
Remember, skegs are removable for a reason. You simply don’t need a skeg unless it’s windy. Therefore, unless you make a habit of going out in windy weather, there’s no need to invest in a skeg.
If one is included with your kayak, you could install it to use when you need it, but you certainly don’t need to use it all the time.
How Do You Add and Remove a Skeg For an Inflatable Kayak?

As noted, some inflatable kayaks come with removable skegs. These kayaks will have a built-in slider–a place on the hull for you to slide the skeg in and out. The process is extremely simple and you can see how to do it in this video.
Bear in mind, though, the process may be slightly different for different kayaks. The important thing is that the skeg locks in place into the slider when you go to use it.
Many inflatable kayaks don’t come with this removable skeg. If you have one of these kayaks, you’ll need to purchase a skeg separately and install it yourself.
is a good cheap skeg option. To mount it, you will have to glue the slider in place with good-quality marine glue. Once the slider is mounted, you will slide the skeg in and out of the mount–the process should be similar to what is shown in the above video.
The is a popular choice among serious kayakers who need a solid, durable skeg that won’t break easily. Installing this skeg is a bit more challenging.

You can see how to add this type of skeg to your kayak by watching the above video. Then, follow these steps:
- Tie a string between the bow and stern D-rings to help you line up the template. The string is simply there to help you position the template square with the hull. Place the template 31 inches from the stern for a tandem kayak and 25 inches for a solo kayak.
- Tape the template in place and trace the inside of the template–it is basically a large stencil, and once you have traced the inside pattern, you can remove the template from the kayak.
- Place the skeg patch inside the traced pattern, paying attention to the markings on the patch showing which is the bow end and which is the stern end.
- Protect the area around the stencil marking with masking tape or newspaper. Clean the area inside the stencil mark, as well as the underside of the skeg patch, with denatured alcohol.
- Use sandpaper to scuff the surface of the hull inside the stencil mark, wipe it down with denatured alcohol again, then apply a layer of marine glue to the area. Repeat this process with the skeg patch, then allow both to dry for about 25 minutes.
- Apply a second coat of glue to the boat and the skeg patch. Allow the glue to fully dry this time–it should no longer be tacky.
- Place the patch glue-side down on the boat, making sure to line it up exactly. Use a heat gun on the boat and the patch to make the glue tacky again, doing one side at a time.
- Press the patch firmly against the boat, rubbing away any air bubbles. Apply heat from the heat gun liberally over the patch until the area is not quite too hot to touch.
- Remove the tape and newspaper from the boat. The patch is now in place, but you will need to allow the glue to dry and set for at least 24 hours.
- When you’re ready to put the skeg in, slip the front into the front pocket and the back into the back pocket of the patch. This should be done before the kayak is fully inflated. Once the skeg is in place, finish inflating the kayak. The air pressure will help to hold it in place.
How to Use and Care For a Skeg?

As noted above, skegs are meant to be used especially in windy conditions. If you have a skeg, it may be best to remove it when you’re kayaking in calm waters. As you might imagine, your skeg will need regular care and maintenance to keep it in proper working order.
Some tips for caring for your skeg include:
- Rinse after every use: rinsing the skeg and slider will help wash away any dirt, sand, or other debris that may build up.
- Remove between uses: If you have a removable skeg, remove it and dry the slider after every use. If you have a retractable skeg, leave it deployed while in storage.
- Don’t drag the boat on sand or rocks: This is important whether your skeg is in place or not. If it is in place, dragging it across the ground may damage the skeg. If it isn’t in place, you may get dirt and pebbles jammed in the slider.
Regardless of what you do with your kayak and skeg, be careful not to damage the slider. If it becomes damaged, you will have a hard time using the skeg and may need to replace it, which will cost extra time and money.
Can I Make a DIY Skeg?
Yes! In fact, there are many ways to make your own skeg–there’s no one right or wrong way to do it, and you may have to try different approaches depending on your available materials, the kayak design, etc.
For some different ideas, check out the following videos:


Conclusion
Skegs are removable or retractable fins that help you maneuver your boat during windy weather. While you don’t have to have one on your kayak, using a skeg can make your job a little easier when you’re trying to avoid being blown off-course.

I created this site to help people – to help you – with your boat problems. Instead of helping one person at a time, I want this website to be the “one-stop-shop” for everyone’s boating concerns. Read more.