Marine batteries have a tough life. Unlike a car battery, which starts the car with a jolt of power and then is allowed to recharge, marine batteries must also fill the role of a more traditional battery keeping the lights, pumps, and other boat functions operational after providing that quick surge.
With this in mind, it’s no wonder that marine batteries often need to be replaced; or do they? Many articles claim a dozen methods for reviving dead marine batteries, but do they really work?
The short answer is yes.
Batteries are one of the most highly recycled devices because a battery dying only leaves a small percentage of the total material unreactive. By jumpstarting the reverse reaction or cleaning out the unreactive material you can have your battery up and work again with minimal effort.
Table of Contents
Manipulating the Charger (a.k.a. The Easy Solution):

Sometimes, when a battery reads as dead it is merely less reactive, but not totally unable to hold a charge. In these cases, the large energy flows from traditional charging units overwhelm the battery and prevent it from working, resulting in a “bad” reading. In these cases, there is a surprisingly simple solution by utilizing a slower influx of energy:
Equipment needed:
- Old “Bad” Lead-Acid Battery
- New Lead-Acid Battery (preferably of the same voltage as the old one)
- Set of Battery Cables
Equipment Needed for Optional Cleaning:
- and
- Water
- An Old Toothbrush
- A Pair of Wrenches Sized for the Battery Terminals
- (Optional)
Step 1: Assess and Clean the Battery Terminals
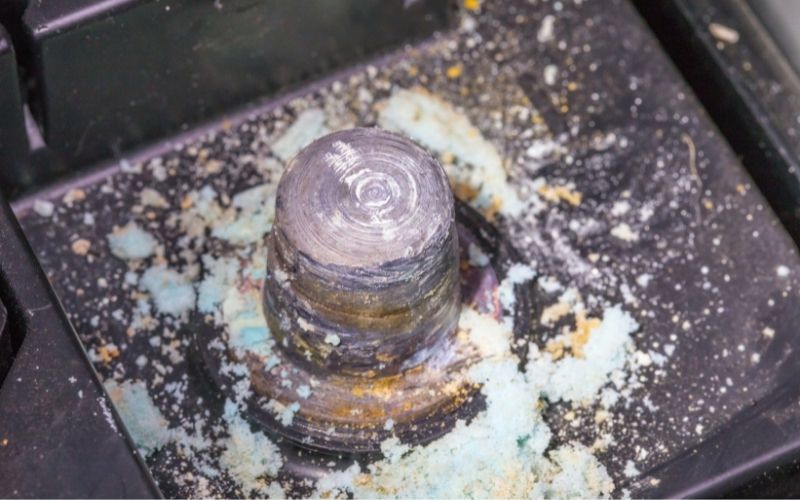

Even if you aren’t going to open the battery cells, cleaning sulfate deposits off the battery terminals can mean all the difference in keeping the battery healthy. If you see white powder crystals forming on the battery terminals, you will need to clean those off before you start reconditioning.
These deposits are toxic, so make sure to wear gloves and safety goggles. To clean the terminals, mix a solution of ½ gallon of water and ½ pound of baking soda, adding a few drops of dish soap to the mixture if the battery appears grimy.
Then, using the wrenches to remove the clamps, clean under, in, and around the clamps and terminals with the baking soda solution and a toothbrush.
Before reattaching the terminals wipe the battery dry, watching for any damage or cracks to the battery casing. Apply a small amount of petroleum jelly, about a teaspoon on each, to the terminals and reattach the clamps.
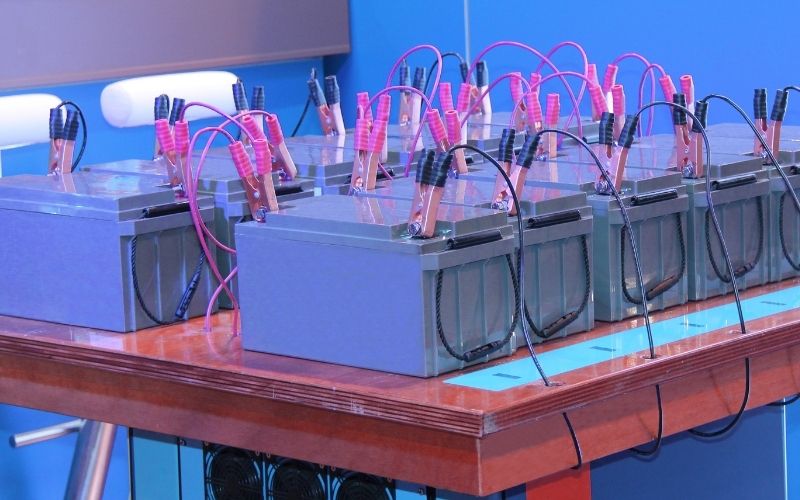
Step 2: Start Charging with a Good Battery
Using the jumper cables, attach the good battery in parallel.
To do so, connect the negative cable (black) to the good battery first, then the other negative end to the bad battery before connecting the positive end (red) of the cable to the bad battery first and finally completing the circuit by connecting the last positive cable end to the good battery.
Step 3: Connect Charger to Good Battery
After allowing the bad battery to start charging through the good one, connect the trickle charger to the good battery before plugging it in. Doing this will allow the charger to believe it is charging a good battery while some charge is absorbed by the old battery, charging it at a rate it can accept.
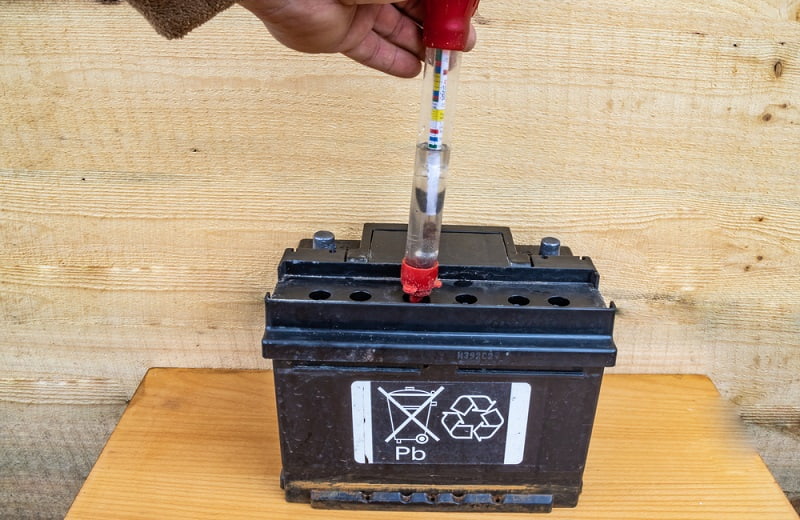
Step 4: Test Old Battery
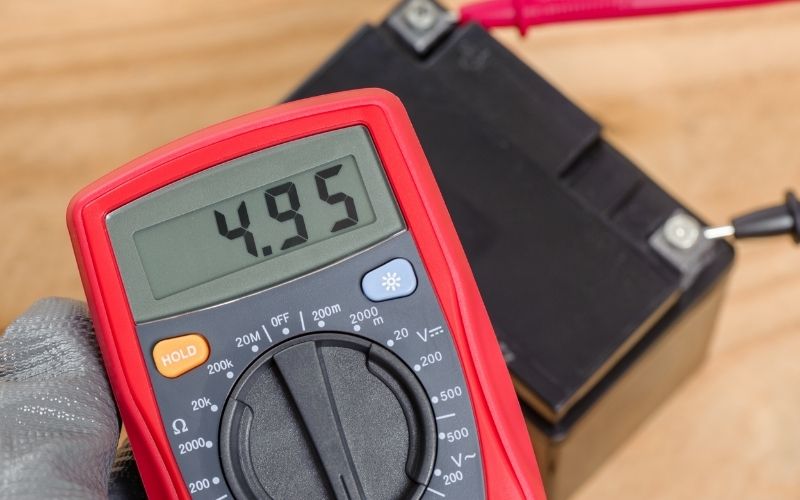

After allowing the old battery to charge through the new one in this way for at least an hour, unattach the batteries and charger and let the bad battery sit for 10 minutes before using a battery tester to check if the bad battery is holding any charge. If it is, reattach all the cables and let it charge till full (about 12-24 hours). If not, you will need to try the more advanced reconditioning techniques below.
Step 5: Wait
After the bad battery is fully recharged, wait about a week to see if it maintains its charge. If it does, you should be safe to use the battery. If not, you won’t want to use it again without a full reconditioning.
Battery Liquid Replacement (a.k.a Full Battery Reconditioning)

Sometimes there is too much lead sulfate built up inside the battery for it to hold a charge, in which case you will need to clean out these crystals and refill the battery with liquid. When doing this process, be sure you are using a flood Lead-Acid battery. If you are using a AGM or Gelled Acid battery, the process for reconditioning will need to be adjusted accordingly (see below these instructions for those changes).
Equipment Needed for Cleaning:
- and
- Water
- An Old Toothbrush
- A Pair of Wrenches Sized for the Battery Terminals
- (Optional)
Equipment Needed for Replacing Battery Liquid:
- Gloves, Safety Goggles, and a
- A or
- A Spare Rag/Washcloth
- (Must be small enough to feed liquid through battery caps)
- A Bucket (To hold and dispose of acidic waste)
- One of the Following (Optional)
- : Can improve battery longevity
- : Can improve battery capacity. Do not use both as the two substances will react

Step 1: Set up a Safe Space
Before doing anything, keep in mind the “acid” part of lead-acid battery: the liquid within the battery contains sulfuric acid and will burn your skin, eyes, clothes, and anything else it may touch; so ensure you are in a well ventilated area and wearing proper protective gear including protective glasses/goggles, gloves, and a plastic apron.
Also keep in mind that hydrogen gas, which will be present as you open and charge the battery, is highly flammable, so open flames and lit cigarettes should be kept far away.
Step 2: Clean the Battery Terminals
Use a baking soda solution to clean the battery terminals, as detailed above.
Step 3: Open Battery Cells
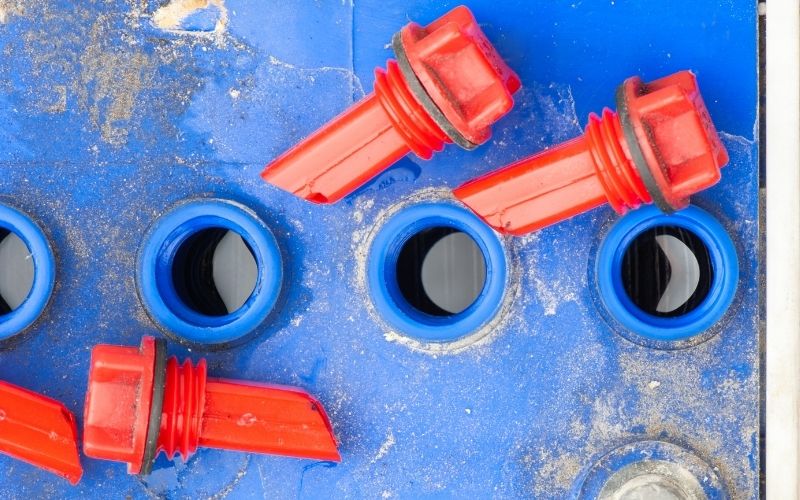

Carefully use the needle nose pliers or screwdriver to remove the cell covers of the battery. This process is usually fairly easy but may differ based on the individual battery, so look on the manufacturers’ website if necessary. As you do so make sure no dust or dirt gets in as this can ruin the battery; using the rag as needed.
Step 4: Empty Battery Liquid
Pour the acid-water mixture out of the battery and into a container for disposal, adding baking soda to the solution to neutralize the acid.
Step 5: Clean out Battery Cells
Mix a solution of about 5 ounces of baking soda and ½ gallon of distilled water. Use the funnel to fill each cell with the baking soda solution, replace the caps, and shake for ~30 seconds. Repeat this process 2-3 times to fully clean each cell.
Step 6a: Prepare Battery Solution (Optional)
Fill a clean and dry container, rinsed with a bit of distilled water to clean off any mineral residue, with ½ gallon of distilled water. To this, add either 12 fl. oz of hydrogen peroxide (unheated) or heat the water to 66 degrees celsius (150 degrees Fahrenheit) and add 1 ½ oz Epsom salt. Repeat this process if you need more liquid, but don’t prepare too much at once or it won’t mix correctly.
Step 6: Fill Battery Cells
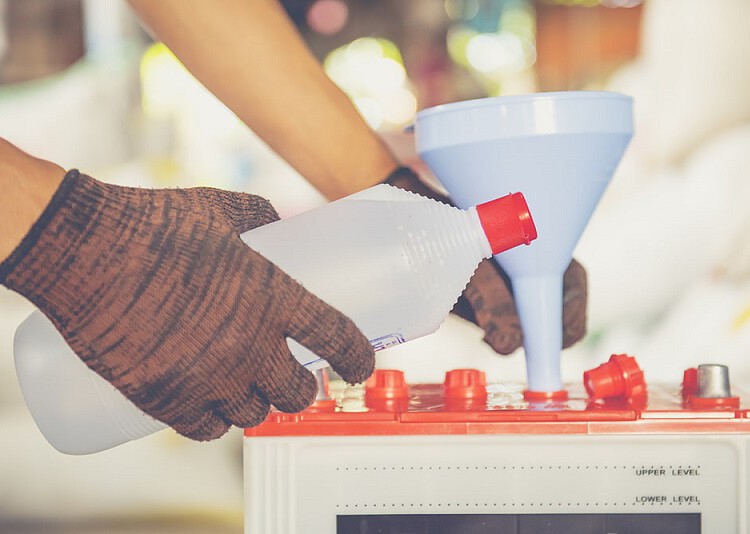

Rinse the funnel with distilled water and fill each of the battery cells with distilled water or the battery solution you prepared. Ensure each cell is completely filled or it will put the battery at risk for explosion.
Step 7: Trickle-Charge the Battery
Without putting the caps back on, trickle charge the battery until full (~12-24 hours, depending on the charger and battery). The liquid may overflow due to the heat of recharging, but this is normal. Test the battery to ensure the process worked.
Step 7b: Cycle the Battery (Optional)
Still, before replacing the caps, discharge the battery part of the way and then recharge it once again
Step 8: Replace caps
Use a rag to clean any spilled liquid (while wearing gloves, and put the rag in a baking soda solution to neutralize the acid before cleaning). Then top off each cell and replace the caps. Your battery should be restored close to its original capacity.
AGM and Gelled Batteries:

For these batteries, the liquid in the battery is held in a glass or gel membrane rather than being allowed to flow freely. For these batteries, you won’t be able to empty or clean the inside of the cells, instead, clean their terminals (Step 2) and top off the existing liquid with distilled water (Step 6) before charging them back up with a trickle charger.
FAQ
1/ Do These Processes Really Work?
It depends on your situation, but more often than not these techniques will restore a dead battery. Give it a try and let us know if it works for you!
2/ Are There Any Other Methods I Can Try?
Yes! This article is specifically for batteries that won’t take a charge at all. For other batteries, you may be able to increase their capacity by draining them and recharging them a few times or using the old trick of charging a battery, letting it rest, and then putting it back on the charger for an hour or so.
3/ Do I Need a Trickle Charger?

Not necessarily, but it certainly helps. Often a dead battery cannot function with the high voltage of a regular charger, so allowing it to run a few cycles with a trickle charger will help it recover and be able to function in a regular charger again.
4/ Should I Revive a Dead Marine Battery?
Yes! New batteries are expensive, and it doesn’t hurt to try and salvage an old one before having to scrap and replace it!
5/ What is the Difference Between a Lead-Acid, Deep-Cycle, Marine, AGM, Gelled, Flood, and Starter Battery?

All of the batteries discussed in this article are lead-acid, which refers to the reactants found in most automotive and marine batteries as they are inexpensive with a high capacity.
Deep-cycle, marine, and starter batteries are classifications based on batteries short term power vs long term sustainability; with deep cycle batteries able to maintain a low power output for a long time, starter batteries able to output a large jolt of power before needing to recharge, and marine batteries sitting in the middle.
AGM, gelled, and flood denote whether the acid in the battery is allowed to flow freely, as in a flood battery, or if it is contained within a gel (for gelled) or fiberglass (for AGM) matrix.
The Electrochemistry of a Lead-Acid Battery and the Effects of Magnesium Sulfate on the Sustainability of the Lead-Acid Reaction (a.k.a. The Nerd Stuff)
Lead-acid batteries, the most common type of battery used in both cars and boats, discharge by transforming sulfuric acid into water. During the discharge reaction, the high energy bonds of sulfuric acid (H2SO2-) near the negative plates break apart, with the sulfate group (SO2-) breaking off and joining the lead in the negative plates to form lead sulfate (PbSO4). This process frees two electrons, which must move through whatever circuit the battery is powering, and the hydrogen atoms, which are free to move through the liquid in the battery, to react on the positive plates. At the positive plates, these made from lead oxide (PbO2), a similar reaction takes place. This time the sulfuric acid (H2SO2-) near these plates uses the two extra hydrogen (H+) atoms from the other reaction to combine with its own two Hydrogen atoms, allowing the oxygen group (O2) from the lead oxide (PbO2) to join the four hydrogen atoms and recombine into two water (H2O) molecules. With water formed, the sulfate group (SO2-) and excess lead (Pb+) are free to join together, transforming the positive plates into lead sulfate (PbSO4) as well.
Recharging the battery is done by applying energy and forcing the new bonds to break apart. With electrons flowing the opposite direction now, the lead sulfate (PbSO4) in each of the plates has no choice but to release their bonds, unstable without the proper number of electrons to maintain their balanced charges, and revert to their original forms. Each time this happens, however, not all of the lead sulfate reacts, leaving deposits of the powdery-white salt behind. In addition, if the battery is recharged too quickly, some of the hydrogen and oxygen will be released into the atmosphere before they can reform into water, causing the reaction to slow from a shortage of liquid (Klaus Schmidt-Rohr 2018).
These are the two problems we seek to remedy when reconditioning a battery. The buildup of excess lead sulfate is easy, all we need to do is use a solution of water and Sodium Bicarbonate to recombine the lead sulfate into lead carbonate, which will dissolve in water and can thus be cleaned off. Complicated only by the fact we need to open the battery caps to access the individual cells, the water in the battery can be replaced and refilled without too much trouble either. Removing some of the lead sulfate in this way, while essential to stop it from coating the plates and vastly decreasing the surface area for the reaction to take place, will obviously result in an overall lower capacity for the battery (less material to react equals less of the reaction taking place). That being said, reconditioning a battery in this way has been shown to in many cases revive a battery that would otherwise fail to hold a charge.
Finally, as a battery ages there is one potential ingredient that has been shown to increase its capacity: epsom salt, or magnesium sulfate. As shown in laboratory studies (Venkateswarlu et al 2018), having another reactant to absorb excess lead sulfate before it can crystallize has a positive effect on battery longevity. While other materials have been shown to fill this role in commercial applications, the combination of effectiveness and accessibility makes magnesium sulfate ideal for reconditioning batteries at home.

I created this site to help people – to help you – with your boat problems. Instead of helping one person at a time, I want this website to be the “one-stop-shop” for everyone’s boating concerns. Read more.