
If you rely on your boat batteries, the last thing you want is to leave them on the charger all night, only to find they didn’t charge. This could lead to you being unable to start your boat in the morning or, worse, getting stranded out on the water.
If your battery dies unexpectedly or doesn’t seem to take charge, you may initially suspect the problem is with the battery itself. But have you considered checking the charger?
The truth is, charger problems are an often-overlooked cause of electrical failure on your boat. So, what can you do about it?
Are there any ways to test your charger?
Several, actually.
Keep reading for more information on how to test a marine battery charger, including helpful videos and step-by-step tips.
Table of Contents
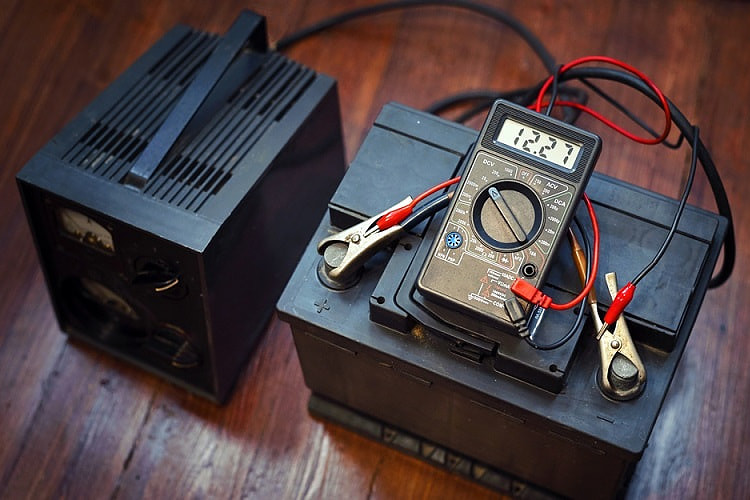
1. Use a Multimeter
A multimeter allows you to test whether any energy is coming out of your battery charger. If you suspect the charger isn’t properly charging your batteries, the best and easiest way to test it is to use a multimeter, as shown in the following video.

Follow these steps:
- Turn on your multimeter and set it to DCV 20, or simply DC. This will allow you to check the voltage of your battery without drawing energy from it.
- Make sure your charger is not connected to your battery or that it is turned off. This is important to get a reading on the battery without any influence from the charger.
- Place the multimeter leads against the battery terminals, red to positive and black to negative. You should get a reading on the multimeter to indicate the battery’s current voltage. Remember this reading.
- Connect or turn on the charger.
- Again, place the multimeter leads to the battery terminals and check the reading. Compare it with the earlier reading. If the charger is charging properly, the reading should be higher than the one before. If not, it will be unchanged.
2. Charge Multiple Batteries
If you don’t have a multimeter, you can test your battery charger by hooking it up to different batteries one at a time. The idea is that, if one battery doesn’t seem to be charging while the others charge normally, you may have a bad battery instead of a bad charger.
Check out this video to make sure you know how to properly wire the charger to your batteries.

To transfer your charger from one battery to another, follow these steps:
- Disconnect the charger leads from the first battery, removing black first, then red.
- Connect the leads to the second battery, red lead to positive terminal and black lead to negative terminal.
- Check to ensure the charger is turned on.
- Wait the appropriate amount of time, allowing the battery to charge fully.
- Disconnect the charger and test the freshly charged battery by operating any devices connected to it. If the battery works as it should, then it is properly charged. If not, it was unable to receive a charge and your problem is likely with the charger.
3. Look for Visible Damage

If your charger isn’t working, the problem may or may not be due to damage you can see. If your multimeter indicates a problem or you suspect the issue is with your charger, start by examining it for physical issues.
Follow these steps:
- Check for corrosion around the leads. If the charger has been left out in the weather at any time, water, sunlight, or salt can cause corrosion. If you see signs of rust or build-up, gently clean the area with a brush to try and establish a better connection.
- Inspect the wires to see if any of them are frayed or torn. The wires are typically the most fragile part of a charger, and they can become damaged through misuse or normal wear and tear. If your wires are damaged, chances are your charger won’t charge.
- Look for any broken or missing parts. If there is no corrosion and no sign of wire damage, check for anything else that may be amiss. It’s possible the power button could have gotten stuck in the “off” position, or a piece got broken off the charger.
4. Check the Charger’s Wiring
If you have a single charger connected to two or more batteries, you may find that only one battery receives a charge while the other does not. Before assuming that you have a bad battery, you’ll want to make sure all the batteries are wired properly to the charger.
There’s always the possibility that one of the charging leads is bad, or that both were accidentally wired to the same battery. To avoid improper wiring issues from the start, check out the following video on how to properly install an onboard charger.

Follow these tips to double-check your wiring:
- Make sure the correct leads connect to the correct terminals. If you have a multi-bank charger, you will have multiple sets of red and black leads. Make sure the red and black from the same set go to a single battery.
- Make sure all batteries are connected. Connect one set of leads to each battery you want to charge. If you only connect one lead to a battery or forget to connect leads to that battery in the first place, it will not charge.
- Reverse the leads to cross-test. If everything is wired properly and one of your batteries still isn’t charging, switch the leads on the batteries and see if that makes a difference. The problem may be with one of the leads itself instead of the wiring.
5. Check Your Fuses
Your boat should have fuses or circuit breakers on the wiring of all batteries except the starter. If you can’t find any problem with your charger and you suspect your battery is not the issue, try checking the fuses in the electrical system.
If you’re not sure what the fuses look like or what purpose they serve, check out the following video:

Follow these steps to check your fuses:
- Locate the fuses in and around the battery box and charger. If you’re not sure what they look like, refer to the video above, which gives you several great visuals. You may only find one or two fuses, or you may find several. You’ll want to check them all.
- Look for broken or discolored fuses. Do any of the fuses have a faded, yellowed, or burned-out look? Do any of them appear broken or out of place? Any fuse that looks “off” has most likely blown and needs replacing.
- Replace broken fuses with new ones. Make sure the power supply to this portion of wiring has been cut, then slide the old fuse out and snap a new one in place. Depending on its location, it may be difficult to reach and you may need to use a pair of pliers.
Conclusion
If there seems to be a problem with your marine battery charger, the best way to test it is using a multimeter. But if you don’t have a multimeter or you want to find the specific problem with your charger, there are other ways to inspect it as well.
Hopefully, after reading this article, you’ll have a better understanding of how a marine battery charger may fail and better confidence that you can find and fix the problem. With a little persistence and luck, you’ll have your boat batteries charging again in no time!


Sarah Hood has been writing for Anchor Travel since 2021. When she’s not writing, she enjoys cooking, singing, and spending time in the great outdoors.