Sometimes, it’s necessary to take the outboard motor off your boat.
Maybe you’re replacing it with a new motor, or moving your existing motor to a new boat. Whatever the reason, you need to know how to take an outboard off of a boat in the most efficient and practical way possible.
Keep reading! In this article, we’ll talk about various ways to remove an outboard motor from a boat.
Table of Contents
How Do You Remove an Outboard Motor From a Boat?
As you might imagine, there are many different ways to pull an old motor off your boat. Naturally, different methods may work better for different types of motors and boats, as there are many different designs out there.
For the basic method described below, we’ll follow the steps in this video:

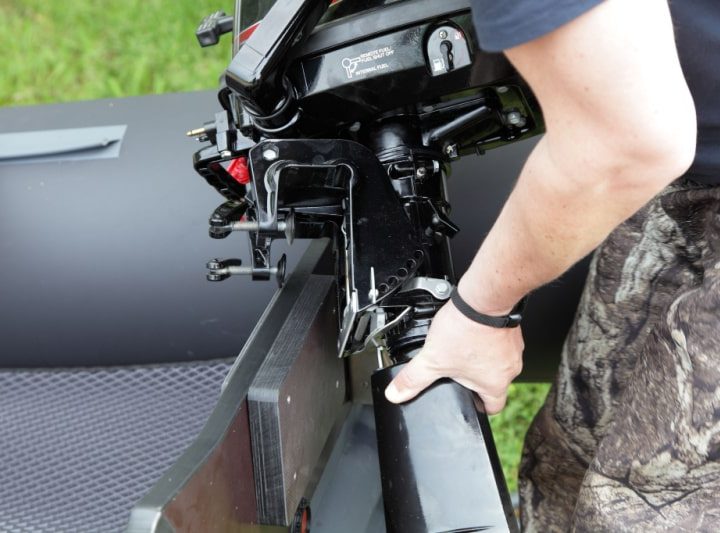
Step 1: Disconnect Steering Arm, Fuel Line, Battery, and Cables
Before you can actually remove the motor, anything that connects it to your boat needs to be removed or disconnected. That usually means removing the steering arm, disconnecting any fuel lines, battery leads, and various other cables.
The locations for each of these may be slightly different for each motor. If you’re not already familiar with where all your connections and cables are, you may need to use your owner’s manual to identify and locate them.
Once you have done this, carefully disconnect each component so as not to damage them, then place them out of the way so they don’t get pinched or damaged while you’re removing the motor itself.
Step 2: Remove the Bolts
Regardless of the type of motor you have, there should be bolts holding the motor onto the boat. Unscrew the nuts holding these bolts in place, then remove bolts.
Depending on the motor you’re working with, you may have to remove the motor cover or other parts to get to the bolts. Follow your manual.

Once the bolts are removed, the motor will still be hanging by screws, and the design of the mount will help to hold it in place until you lift it up and off of the transom.
Step 3: Hammer Transom Screws
Locate the transom screws: these will look similar to bolts sticking out from the transom itself through the motor mount.
They will most likely be jammed in place and you won’t be able to just screw them loose or pull them out. Hammer them gently to loosen their hold.
Continue hammering until they are flush with the mount, then use a tool of your choice to drive the transom bolts further until they are flush with the transom.
At this point, the motor should be loose from the mount, simply hanging by its own weight on the transom.

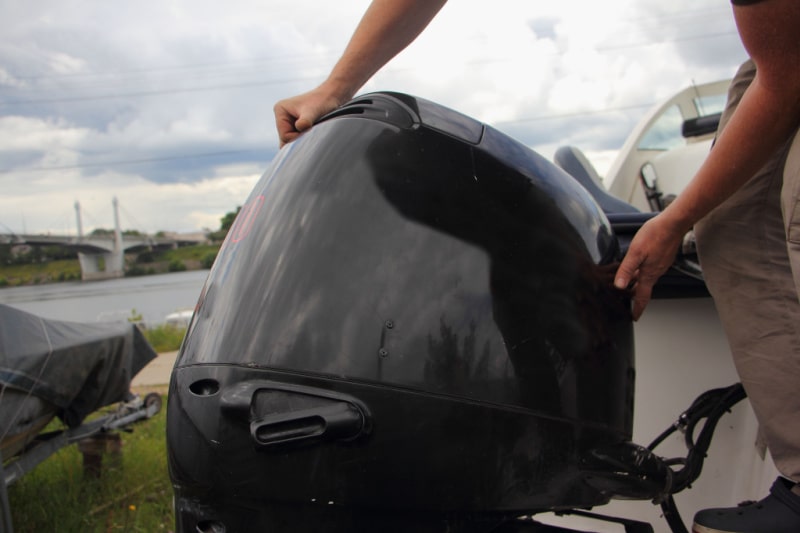
Step 4: Lift the Motor Off the Boat
This is the hard part, especially if you have a particularly large or heavy motor.
What’s more, depending on the type of motor you have, you may need to remove the cover plate or other parts before being able to move the motor itself. Again, follow your owner’s manual.
If you have a strong friend or two to help you, you may be able to simply lift the motor up off of its mount.
That said, the easiest way to move a motor is to use a hoist. Check out the following video if you plan to work with a hoist.

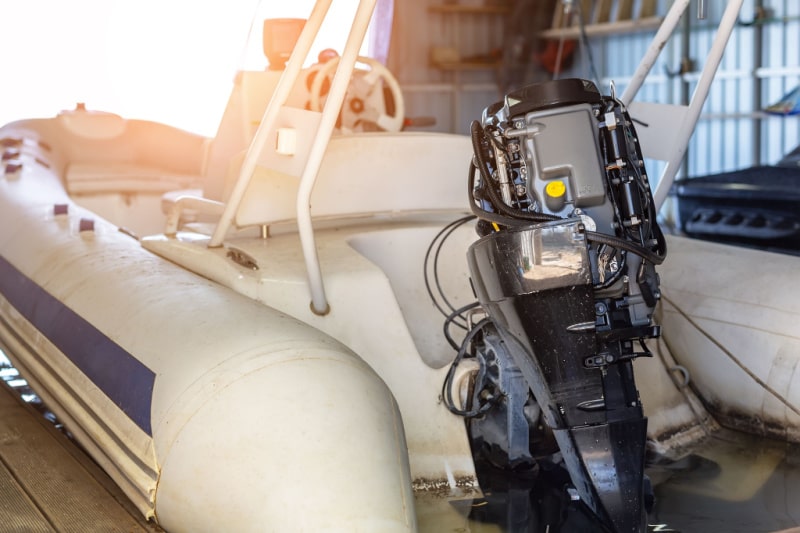
Step 5: Move it to a Stand or Trailer
Move the motor to a stand or a trailer. You can do this in whatever way is easiest for you: either by moving the motor or by moving the stand or trailer.
If it’s an old motor that you’re just going to scrap, it doesn’t matter how you lay it on the trailer. If you plan to sell or reuse the motor, it is best to place it on a stand. Only lay it on its side if the owner’s manual says you can.
How Do You Lift an Outboard Motor Without a Hoist?
Obviously, the best way to move an outboard motor is by using a hoist as shown in the video above. But what if you don’t have a hoist?
If you have a small enough motor, then all you need is enough manpower to lift and carry it. You may only need two strong guys to move a small motor; for a larger motor, you will probably need three or four people to move it.
The larger the motor, the harder it will be to lift it without some sort of aid. If you don’t want to invest in a hoist, you can build your own in the form of a gantry, as seen in the following video:

Leave off the wheels if you’re building a gantry according to the video.
To use or build a gantry, follow the steps below:
Step 1: Find a Sturdy Tree Branch
A gantry is essentially any sturdy frame that you can throw a rope over and use to help you lift heavy objects.
If you have a large tree readily available and this tree has a sturdy branch at least 8 inches in diameter, you can use this branch as a gantry.
Attach a heavy-duty strap and a come-along to the branch, hook the come-along up to the motor’s lifting eye, and move onto Step 6 below.
No products found.
Step 2: Gather Your Materials
If you don’t have a readily-available tree branch, you’ll need to build your own gantry. For this, you’ll need a bunch of materials, such as:
- Four or five 2-by-6 beams
- One 4-by-4 beam
- Four or other heavy-duty stakes
- Drill and bit the size of your bolts
Step 3: Pound the Stakes and Secure the Legs
It’s best to secure your gantry to the ground so it can’t tip over when you go to use it. Pound your heavy-duty T-posts or other stakes at least a foot into the ground, then secure the posts that will become the legs of your gantry to these stakes.
Step 4: C-Clamp and Drill Holes
When building your gantry, you shouldn’t use nails or screws. Instead, use C-clamps to hold the different parts together, drill properly-sized holes, and drive strong bolts into the holes. Secure the bolts with nuts and washers, then remove the C-clamps.
Step 5: Attach a Come-Along
Use a heavy-duty ratchet strap attached to a come-along. This will hook up to the motor and allow you to lift it off of the boat.
Back your boat underneath the gantry where the come-along can easily hook onto a secure part of the motor; specifically, look for a lifting eye under the cowl.
Some motors come with this lifting eye built-in; others do not. If you can’t find a lifting eye, check your owner’s manual to see if it might be located in a different spot.
Depending on the type of motor you have, you may need to buy a lifting eye attachment and install it on the motor.
No products found.
Step 6: Remove the Motor
At this point, the motor will still be hanging by its own weight on the boat’s transom; so, you will need someone to help rock the motor gently off of its mounts as you pull the boat forward. Go very slow to avoid breaking anything.
Once the motor is loose from the boat, pull the boat forward enough to leave the motor hanging free on the gantry. You can then lower the motor into the back of a truck or trailer to transport it away, or you can lower it onto a waiting outboard motor stand.
Conclusion
Removing an outboard motor from your boat can be a bit tricky since the motor will likely be heavy and hooked up to various onboard components.
But if you follow the steps in this guide and exercise a little patience, you should be able to successfully remove that old motor with or without a hoist and move it to a trailer or stand.
You’ll soon have a new motor installed and will be back out on the water in no time. Good luck and stay safe out there!

I created this site to help people – to help you – with your boat problems. Instead of helping one person at a time, I want this website to be the “one-stop-shop” for everyone’s boating concerns. Read more.