So you just bought yourself a brand new transducer. Congratulations!
Before you can start tracking down where all the fish are, you need to figure out how to mount the transducer on your trolling motor.
If you’re not sure how to do that, you’ve come to the right place!
In this article, we’ll discuss step-by-step instructions for mounting your new transducer on your Minn Kota trolling motor.
We’ll also answer the question of whether there are other ways to mount your transducer, as well as if there are any specific instructions for certain Minn Kota models.
Are you ready to get started?
Table of Contents
A Basic Step-By-Step Guide for Mounting a Transducer on a Trolling Motor
The first thing you’ll need is a . Some transducers may come with this accessory, but in most cases, you’ll need to purchase it separately.
Once you have your mounting kit, you can begin to attach the transducer to your trolling motor, as follows:
Step 1: Attach the Transducer to the Bracket
The mounting kit will come with several components, including a clamp, bracket, and the necessary hardware. Attach the transducer to the mounting bracket, following package instructions.
Transducer mounting kits are generally pretty standard when it comes to size, but sometimes the mounting hardware doesn’t fit exactly as expected, as you’ll see in the video below.

If this is the case, you may have to tinker with the hardware or perhaps locate different hardware altogether. The most important thing is that the transducer is held snugly in place in the bracket.
Step 2: Attach the Clamp to the Bracket
Open up the ring-shaped clamp and slip it through the middle of the bracket.
The clamp should pass through the opening below the saddle-shaped segment of the bracket as shown in the above video. It should then wrap upward around the outside of the bracket.
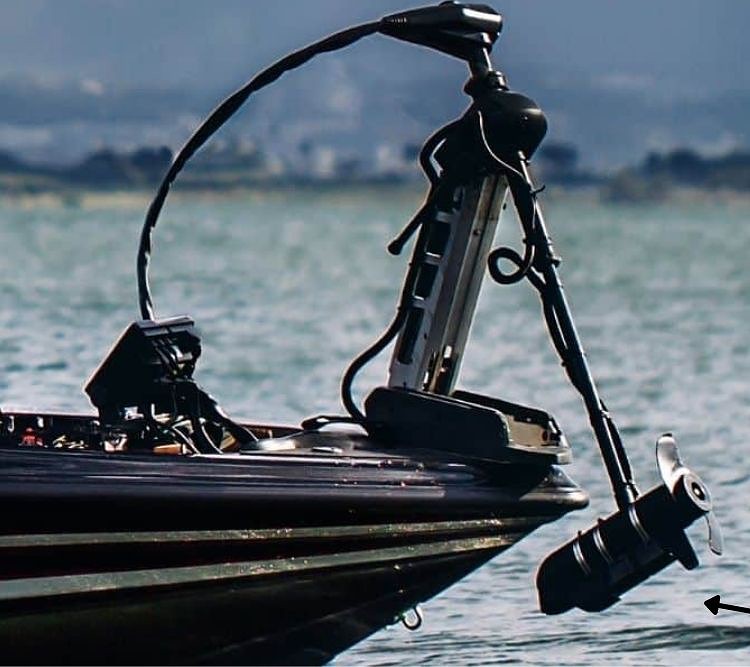
Step 3: Mount the Transducer to the Motor Head
You’ll want to place the mount and the transducer about halfway between the skeg and the props on the trolling motor’s motorhead.
Be sure to leave clearance for when the trolling motor is in its stowed position. You don’t want to bang the transducer on the motor’s cradle every time you go to stow it.
Also, be aware of the wire running from the transducer.
Make sure it doesn’t get clamped to the motorhead when you tighten the clamp.
Ideally, it should be free so you can run it up the trolling motor’s shaft, out of the way of the spinning props.
On that note:
Step 4: Secure the Wire
To secure the transducer wire to the trolling motor shaft, thread the wire through the underside of the mount toward the shaft.
You can then secure the wire to the shaft using zip ties or any other method of your choice.
Be sure and leave some slack in the wire so you don’t tear or stress it as you stow and deploy the trolling motor.
For a visual of this process, check out these two videos:


How Many Ways Can You Mount a Transducer on a Trolling Motor?
There are different types of transducers and different types of trolling motors, but the mounting methods are pretty consistent across all brands.

Trolling motor transducers are always mounted on the motorhead, between the skeg and the props. That said, not all transducers have to be used with trolling motors.
Some transducers are made specifically for mounting on the transom separate from any trolling motor, while others are designed for direct mounting to the boat’s hull.
Some creative DIY enthusiasts may be able to find ways of converting a trolling motor transducer to a transom or hull-mounted transducer. But in general, if you have a trolling motor transducer, it’s best to mount it properly on the trolling motor following the steps above.
Do Different Trolling Motors Require Different Transducer Mounting Techniques?
As mentioned above, the only way to mount a transducer on a trolling motor is to place it on the motorhead using a mounting kit. This is true regardless of the specific trolling motor model you may have.
There are many different Minn Kota trolling motors, from the Edge to the Terrova to the PowerDrive. But they all have the same basic design in the way that the motorhead attaches to the shaft, and the motorhead shapes are similar as well.
For this reason, the only logical place to mount a transducer, regardless of the trolling motor model, is on the motorhead.
The same is true regardless of the type of transducer. There are various styles of the transducer, such as puck-style and bullet-style. But they are all designed to fit the rounded shape of a trolling motor’s motorhead.
Tips for Mounting a Transducer to Your Minn Kota Trolling Motor
Here are a few tips to help make sure your installation goes smoothly and no parts are damaged or lost in the process:

1. Placement is Important
As mentioned above, you’ll want to position the transducer in the middle of the motorhead, directly below the shaft in most cases, between the props and the skeg.
If the transducer is too close to the props, it may cause prop damage or be damaged itself.
When viewed from below, the transducer should be in line with the skeg, as level as possible, so that it will work efficiently.
2. Watch Out for the Wire
A lot of anglers experience issues with the transducer wire getting in the way of the props and sustaining damage. This problem can easily be avoided.
Make sure you direct the wire away from the props as you begin to run it up the shaft. By directing it toward the nose of the motor, you should be able to keep it out of harm’s way.
You’ll also want to leave plenty of slack as you direct it up the wire, especially if you have an adjustable shaft. At the same time, secure the wire at regular intervals up the shaft, as sections of loose wire could get hung up on things and tear.
3. Make Sure Everything is Snug
You don’t want your transducer falling off the motor after only a day or two of use. Make sure the mounting clamp is securely tightened onto the motorhead, and that the transducer is sufficiently secured to the bracket.
It’s also a good idea to check the mount regularly to make sure it doesn’t loosen up with use. Keep a close eye on the wire, as well, making sure it doesn’t become damaged or slack over time.
Conclusion
Mounting a transducer to a trolling motor is simple and straightforward. In nearly every case, it is a simple matter of attaching the transducer to a mount and clamping the mount onto the motorhead.
If you follow the tips and instructions in this guide, you should have your transducer mounted in no time, and you’ll be all ready to head out and start tracking down the fish!


Sarah Hood has been writing for Anchor Travel since 2021. When she’s not writing, she enjoys cooking, singing, and spending time in the great outdoors.