You could be throwing away TONS of energy by rowing the WRONG way.
You’ll huff, puff, and come home to aches all over your body.
I’m not saying you don’t know how to move your boat – heck, even toddlers know this.
All I’m saying is your technique is wrong. And you’re missing out on:
- Never getting tired
- Rowing super fast
- Navigating out of tight situations
- Enjoying a great exercise without hurting yourself
How do you fix it?
Easy.
Avoid the 5 things people do wrong while rowing.
With these, you can say goodbye to rowing problems forever.
Plus, I’ll also throw in 3 rowing techniques everyone should master.
Let’s go!
Table of Contents
5 Things Wrong With Your Rowing

From oar length… to seating position… to rowing techniques – here are 5 things you NEED to know before hitting the water.
1. Your Positioning Sucks
You can have the best ergonomic oars in the world and STILL be uncomfortable and slow.
Why?
Because your positioning sucks.
Proper seating position is king. It’s the first and most important thing to keep in mind when rowing. Without it, you can’t do anything else right.
What’s the proper seating position you might ask?
First, you need to be comfortable.
High-end inflatable boats (such as those made by ALEKO and BRIS) come with raised benches. These solid seats let you sit comfortably for hours and hours… perfect for rowing!
Cheaper boats (like the Seahawk or Excursion) come with inflatable seats that… well… let’s just say you’re better off without them.
Remove them and sit cross-legged on the floor. You’ll feel much better that way.
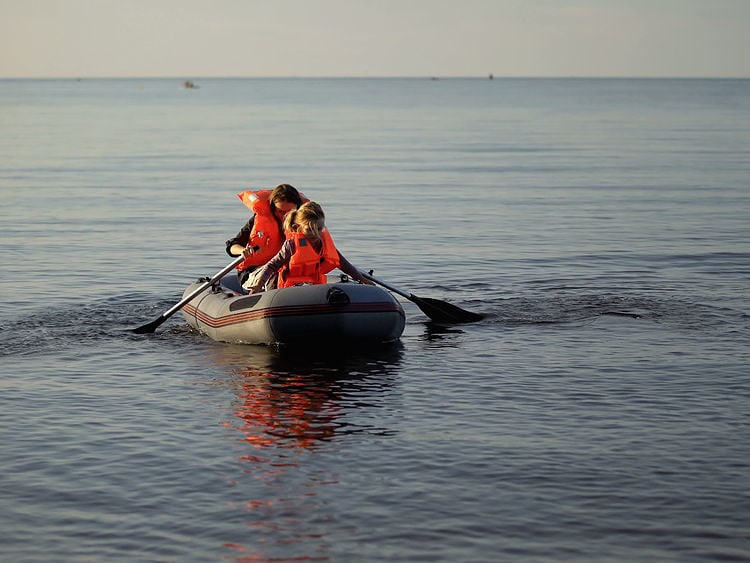
Second, the oarlocks must be in front of you.


Notice how the oarlocks are slightly in front of the man’s knees
You don’t want to be perpendicular to your oars. This will make rowing extremely uncomfortable.
Stay slightly behind your oars… but not too far! You want your oars a little over half an arm’s length in front of you.
2. You’re Holding Your Oars Wrong
Remember learning about levers as a kid?
A lot of people forget this concept when they grow up.
When they take their oars, they don’t use its full length!
Not holding your oars at the very tip makes your strokes inefficient.
Now, you can be forgiven for doing this (unless you’ve been holding your oars dead in the center!).
But the proper way is to firmly hold your oars right at the edge – even wrapping your thumb around the bottom.
This not only gives you more control, but it also allows you to make clean, sweeping strokes. You’ll row way faster with this (because of levers).
3. Your Oars Are Too Short
Most boats come with a set of free oars. Unfortunately, a lot of these are way too short.
You can do everything else right. But if your oars are too short, you’ll still move at a snail’s pace and waste so much energy.
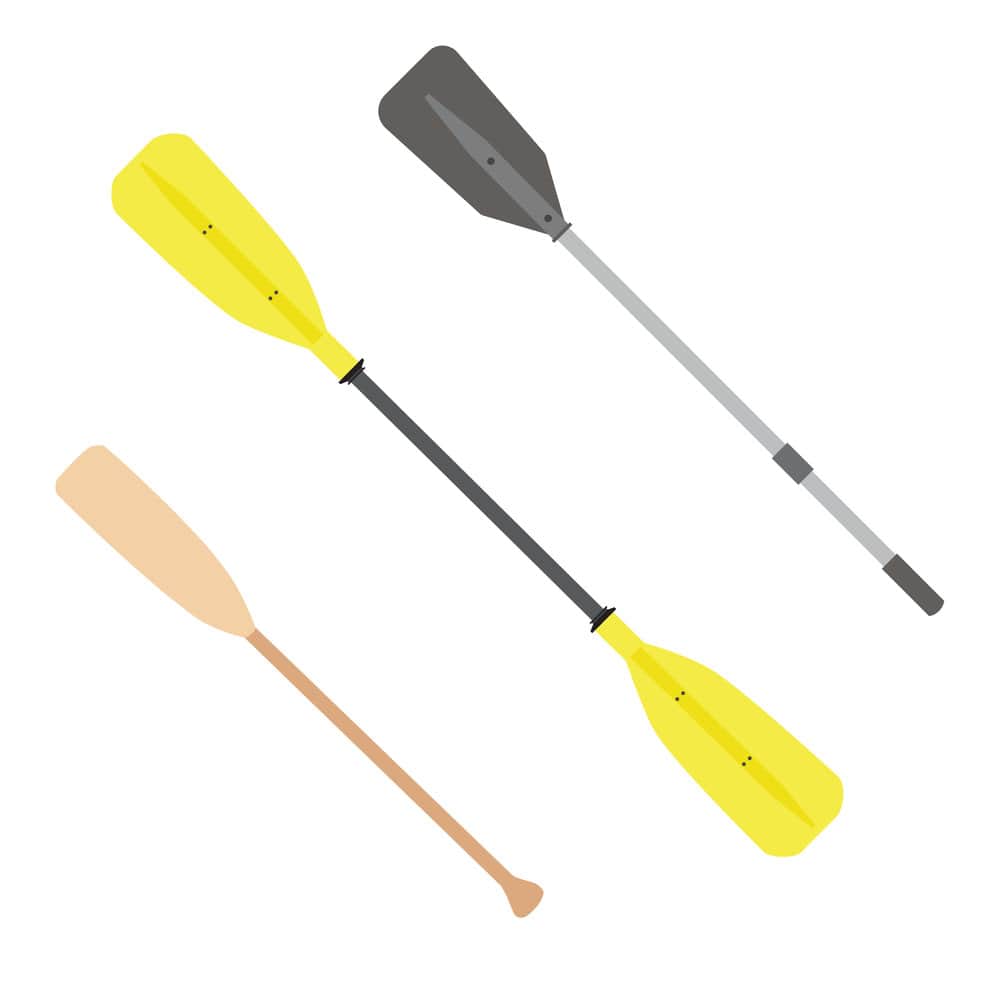

Left to right: canoe oar, kayak oar, and standard oar. Make sure your oars are long enough!
This brings up the question: how long should your oars be?
According to NRS, only ⅓ of your oar should be in the boat. The rest should be out on the water.
If half of your oars’ length is in the boat, your rowing will be super inefficient.
Again, levers. The longer your oar, the easier it will be to propel yourself forward.
4. You’re Only Using Your Arms
What part of your body should be working while you row?
Arms?
Not quite.
Rowing is a lot more about your legs and core.
At least, that’s how it should be.
If you’re only using your arms to row, you’re using a WRONG technique.
Again, everything else can be perfect, yet you will still go super slow and waste a tremendous amount of energy.
Rowing is a full-body workout. With the paddle above the water, lean forward and stretch your arms as far out as you can go – then dip your paddle into the water, lean back, and pull your arms to your chest.
This creates a smooth and powerful stroke. A couple of these will get you around fast.
5. You’re Rowing At the Same Time
If you’re using a tandem inflatable kayak – or a boat with two sets of oars – things can get chaotic.
Rowing at the same time as your partner can make steering extremely difficult, waste a load of your energy, and cause heated arguments.
That’s why Jack Baikoff of Lovers of Inflatable Kayaks says rowing together is a test of relationship dynamics. “It’s like modeling being married for a brief time.”


Looking for date ideas? Test your teamwork and go kayaking!
So how do you conquer tandem rowing?
The best advice I can give is this: don’t.
Don’t row at the same time.
This not only avoids potential conflict, but it also saves you and your partner A LOT of energy.
You’d think rowing together makes your boat go 2x faster. In reality, even with stellar teamwork, you’ll only get about a 1.3x speed increase.
Unless you’re trying to go as fast as possible, this is a waste of energy.
You’re better off taking turns.
3 Basic Rowing Techniques to Make Steering Easier
With proper seating position, oar grip, oar length, and rowing technique – rowing forward will be a breeze.
But how do you turn?
How do you go backward?
How do you bring your inflatable boat to an abrupt stop?
Let’s have a look at 3 basic rowing techniques you need to know.

How to Make Sharp Turn
To make turns, all you have to do is row on one side of your boat.
To turn right, paddle on the left side only.
To turn left, paddle on the right side only.
Every stroke will turn your boat slightly towards the opposite side. Make sure the oar you’re not using is off the water (you don’t want it slowing you down).
Want to make a sharp turn?
Instead of hanging the idle oar above the water, push it in the opposite direction instead.
Pulling one oar and pushing the other lets you make sharp U-turns.
How to Go On Reverse
Another stroke you need to know is the push-stroke.
Push-strokes are the reverse of the regular pull-stroke. Instead of pulling against the water, you push against it.
If you find your legs aching from regular strokes, try switching things up Push-strokes work a different set of muscles, so can get some relief.
Push-strokes are also useful when you want to back up without making a U-turn.
How to Make Pinpoint Stops
Inflatable boats don’t have brakes.
But there is a very easy way to bring your boat to a complete stop.
If you’re moving forward or backward, firmly hold both oars down. This will drag against the water, serving as your boat’s brakes.

Hold both paddles in the water to stop your boat’s momentum
Even if you’re going fast, you’ll be surprised at how strong this “brake” is.
Conclusion
Rowing your boat is easy.
Yet, somehow, a lot of people get it wrong.
With these tips and techniques, you’ll never waste an ounce of energy ever again.
Your rowing will be fast, efficient, 100% pain-free!

I created this site to help people – to help you – with your boat problems. Instead of helping one person at a time, I want this website to be the “one-stop-shop” for everyone’s boating concerns. Read more.