Hooking batteries to a trolling motor is easy.
But if this is your first time doing this – and you realize that installing a battery is not as simple as just “plugging” it in – you need proper guidance.
Do things wrong, you’ll destroy your batteries, your trolling motor, maybe even your boat! Sparks will fly everywhere – and you could get seriously hurt.
So stick around because we’ll look at:
- A simple, step-by-step guide to wiring your trolling motor
- How to hook up 2-3 batteries for 24 and 36-volt motors
- How to extend trolling motor cables
All sprinkled with advanced safety and performance tips for the best and safest fishing trip.
There’s something for everyone here, so let’s get started!
Table of Contents
Trolling Motor Wiring for Inflatable Boats
There are a few ways to wire your trolling motor. Let’s have a look at each one.
The Easiest Way
For this, all you need is your trolling motor and your marine battery.
Step 1: Identify Positive and Negative Cables
Your motor should have two wires: black and red.
Black = Negative
Red = Positive
You can also tell by the + or – sign these wires have.
Identifying one from the other is SUPER important. Get this wrong, your battery can explode!
Step 2: Connect Positive to Positive, and Negative to Negative
Your trolling motor wires should have terminal ends on them (if not, we’ll take a look at how to install them in a bit).
Take your positive wire and connect that to the positive terminal in the battery (look for that + mark). Depending on your terminal end, you may have to screw this in place.
Then follow with the negative wire.
Tadaa!
With that, you’re done! You can fire your trolling motor to life and enjoy the water with those 2 steps.
Easy isn’t it?
The Practical Way
While that method is super easy, it’s not the most practical.
Every time you’re going out, you’ll have to screw in the terminals – and unscrew them when you get back.
But with a few modifications, you’ll have a much, much easier time.
Instead of screwing and unscrewing, all you have to do is plug your motor to the battery.
For this you’ll need:
- Trolling motor connector kit
- Terminal ends
- Wire stripper
- Marine electrical tape
- Basic knowledge of electricity
Connector kits come with two plugs (one for the battery, the other for the motor).

You’ll first want to attach one plug to the battery. If your plug comes with terminal ends, this will be simple. All you have to do is attach the terminal ends to your battery and screw them down.
If not, you’ll have to get terminal ends and attach them to the wire yourself.

To do this, take your wire stripper and strip off the end of the wire’s rubber casing (about an inch long). Then wrap the revealed metal wire around the terminal’s post and screw it in place.

Remove the outer rubber casing to reveal the metal inside your wire.
Remember, positive goes to positive and negative goes to negative!
When that’s done, you can move on to connecting the second plug to your trolling motor.
Cut off the terminal ends from your trolling motor wires. Then strip off some of the wire’s rubber casing to reveal the metal inside.
Attach your stripped wire to the plug’s wire. If you’re using my recommended connector kit, this will have a plastic casing for you to insert it in.
Once that’s in, use a heat gun to seal it in place.

Heat-shrink connectors are a great way to attach two wires together.
Check out this video for a demonstration:

You might also want to put some marine electrical tape where you connect wires. This way, you can be sure no electricity escapes (and no water gets in).

Once that’s done, connecting and disconnecting your battery will be a breeze.
The Safe Way
You don’t need one, but I highly recommend getting a circuit breaker.

If things go wrong, this will stop current overloads or short circuits.
To attach a circuit breaker, all you need is your good old wire stripper.

Start by cutting your motor’s positive cable in half. You want to insert the circuit breaker in the middle of it.
Connect your motor’s now-halved positive cable to the positive terminal on the breaker. Then, using the other half, connect the negative terminal of your breaker to the positive terminal of your battery.
Finish off by connecting the negative wire on your motor to the negative terminal on your battery.
Confused? Check this out:

This is the safest way to set things up.
How to Connect 2-3 Batteries For 24v and 36v Trolling Motors
1 battery will never be enough for a 24-volt motor.
But how do you connect two batteries when your motor only has one wire?
Again, easy.
Let’s have a look.
How to Connect 2 Batteries
To do this, you’ll need:
- 2 12-volt batteries
- Jumper wires
A jumper wire is simply a wire used to connect one battery to another. If you’re buying one, make sure you get the same gauge (thickness) as the wire of your trolling motor.
Here’s the tricky part.
If you want a 24-volt system, DO NOT connect the two batteries positive-positive and negative-negative.

This will prolong your 12-volt run time, but it won’t give you 24 volts.
To get that, use the jumper cable to connect the negative of one battery to the positive of the other.

This gives you the 24 volts you need to run bigger trolling motors.
Want to insert some connectors?
Do it like this:

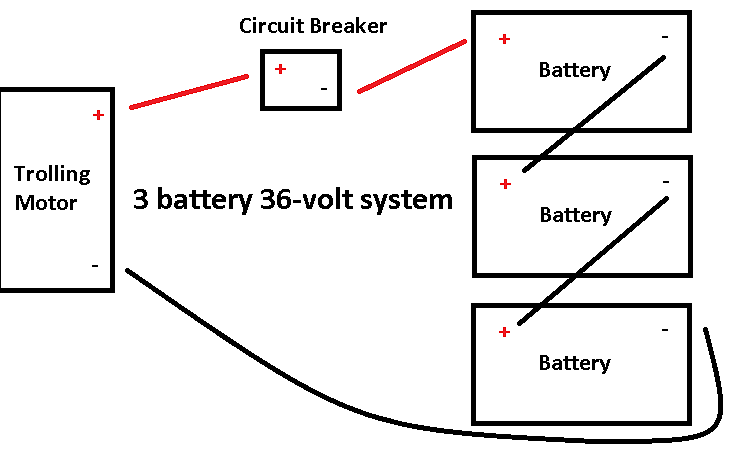
How to Connect 3 Batteries
I know what you’re thinking…
What about 3 batteries?
For three batteries, the concept remains the same:
Positive-positive negative-negative = long 12-volt battery life
Positive-negative positive-negative = 36-volt system
It looks like this:

This lets you run the most powerful trolling motors around.
Now, what about 4 batteries?
Well, it’s the same thing again. But 4 batteries will probably sink your inflatable.
How to Extend Trolling Motor Cables
Let’s say you have an inflatable kayak, and you want to install a trolling motor.
One BIG problem you’ll run into is the wire lengths.
Kayaks are long and narrow, so there’s not a lot of space. A lot of times, you’ll have to put the battery far away from the motor.
Unfortunately, even the best trolling motor brands only have wires going 3-5 feet.
That’s way too short for kayaks.
So how do you extend them?
Step 1: Get Long Wires
Get some long wires to extend your battery reach.
But be careful! Measure how much wire you need first. Buying too much wire is a waste.
In America, we use AWG to measure wire thickness. Check the gauge (AWG) of your trolling motor wires (you’ll probably find it’s 6 or 8)<span style=”font-weight: 400;”>, and get a wire with the same thickness.


AWG is used to measure wire thickness. The lower the number, the thicker the wire
Step 2: Attach the Wires
By now, you should know how it’s done. But let’s go over it one more time.
Take your wire strippers, strip the tips of your motor’s wire and your extension wire, then connect them together.
Using a heat shrink connector will make this process a lot easier and safer

You might also want to add some marine electric tape for more security.
Step 3: Attach Terminals
The other end of your long wires should attach to your battery.
To do this, you’ll need terminal ends.
Jump back up to “The Practical Way” to learn how to attach these.
And that’s it!
With those 3 easy steps, you can run your trolling motor with a battery on the other end of the boat.
Conclusion
You see, wiring a trolling motor is easy!
You don’t have to be an electrician to get this done. All you need is a few basic principles, and you can get your trolling motor up and running.
So wire that motor and hit the water today!
Have any questions or concerns? Leave a comment and I’ll get back to you!

I created this site to help people – to help you – with your boat problems. Instead of helping one person at a time, I want this website to be the “one-stop-shop” for everyone’s boating concerns. Read more.